

Server Name Indication (SNI) is an extension of TLS protocol and is included in the SSL/TLS handshake process to make sure that the client request’s host header matches the website’s hostname and certificate to which the client is connecting to. Using SNI matching, client will be able to specify the website’s domain name during the TLS handshaking process, so that the client request can land in the correct website and receive the correct TLS certificate when multiple websites are hosted in the same web server, each with different TLS certificates. All recent browsers and applications support TLS SNI.
In NSX ALB, TLS SNI hosting is implemented as Parent and Child virtual services. The parent VS holds the virtual IP and handles the initial SSL/TLS negotiation until the phase reaches SNI matching where the request will be forwarded to the correct child VS to present the correct certificate to the client. Optionally, we could also enable TLS SNI matching from ALB to the backend pool members as well. This is needed if the backend web application requires SNI matching and that the incoming client request’s host header is different from that of the configured web application’s hostname. NSX ALB can do a host header rewrite in that case to match with the website hostname on the backend server for SNI matching.
We will cover the entire content in a blog series of two parts. In Part 1, we will take a look at the current TLS SNI web application hosting without NSX ALB and the pre-requisite ALB configurations – vSphere cloud account, IPAM profiles, DNS Virtual service, Delegations and Application Certificates. In Part 2, we will configure the Parent and Child Virtual services, enable SNI to the backend pool members, perform request header analysis, host header rewrites and optional location header rewrites.
Let’s get started!!!
Current Web Application Hosting
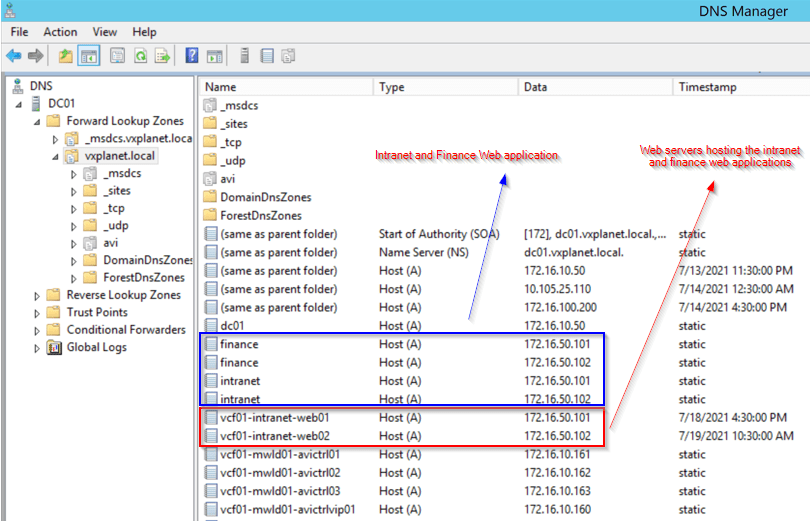
We have two web applications – an Intranet portal (intranet.vxplanet.local) and a Finance portal (finance.vxplanet.local) which is hosted in Microsoft IIS. There are two web servers – web01 and web02, each of them hosts an instance of both applications. TLS SNI is enabled for each web application in IIS and load balancing is achieved by a simple DNS round robin. NSX ALB is currently not enabled. Networking is backed by vSphere DVS port groups and not NSX-T.
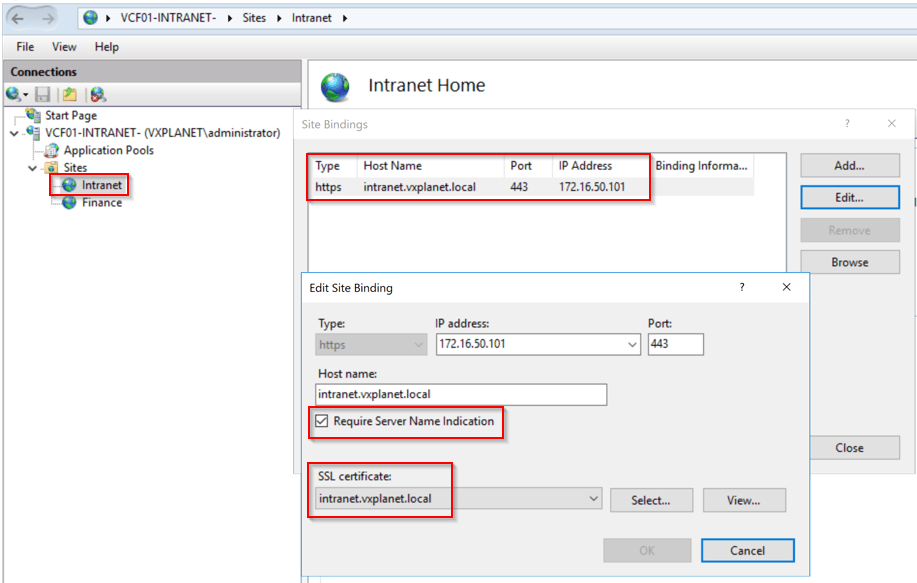
This is the Intranet application in Web01. The application has a single domain SAN certificate pointing to the application name – intranet.vxplanet.local
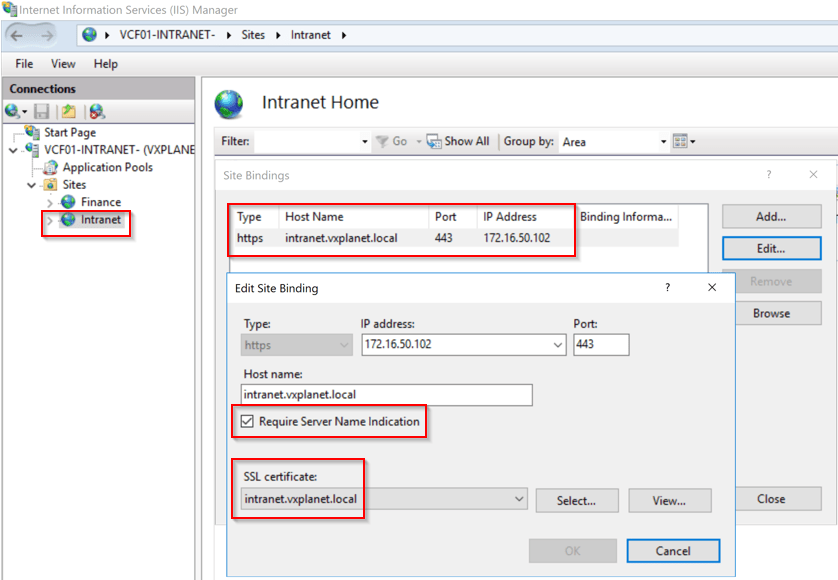
This is the Intranet application in Web02. The same SAN certificate is used here as well.
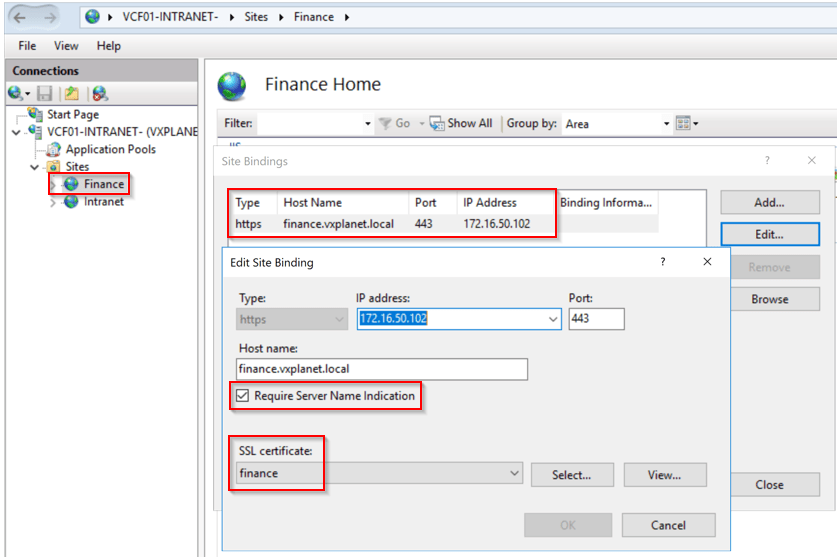
This is the Finance application in Web01 and Web02. This application also has a single domain SAN certificate pointing to the application name – finance.vxplanet.local

We have a simple DNS load balancing way to handle application request to both servers. The application DNS names point to the respective web servers – (Web01 on 172.16.50.101 and Web02 on 172.16.50.102)
We have decided to migrate the application to NSX ALB to leverage the benefits of modern distributed load balancing, analytics, security, scalability, multitenancy, WAF, GSLB and K8S integrations. NSX ALB controller cluster is deployed and the post-deployment tasks – licensing, logging, alerting, user accounts etc are all setup.
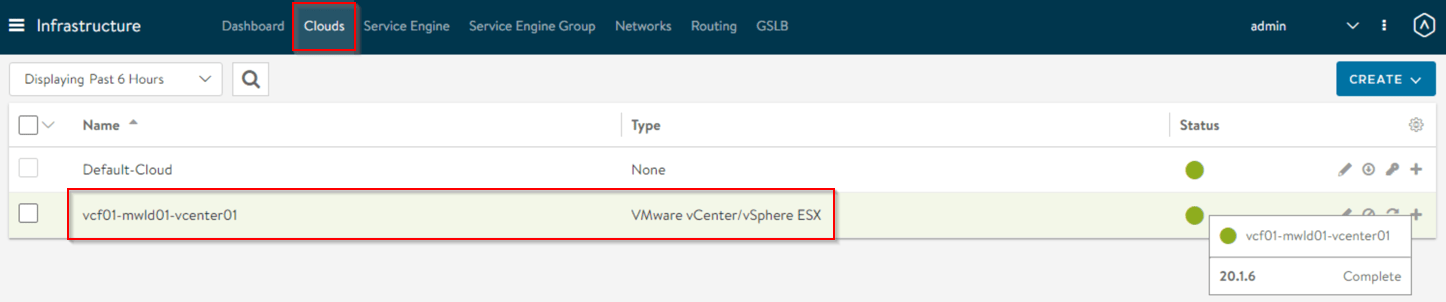
vSphere Cloud Account
We add a vSphere Cloud in NSX ALB and register the vCenter Server.
Creating ALB IPAM profile
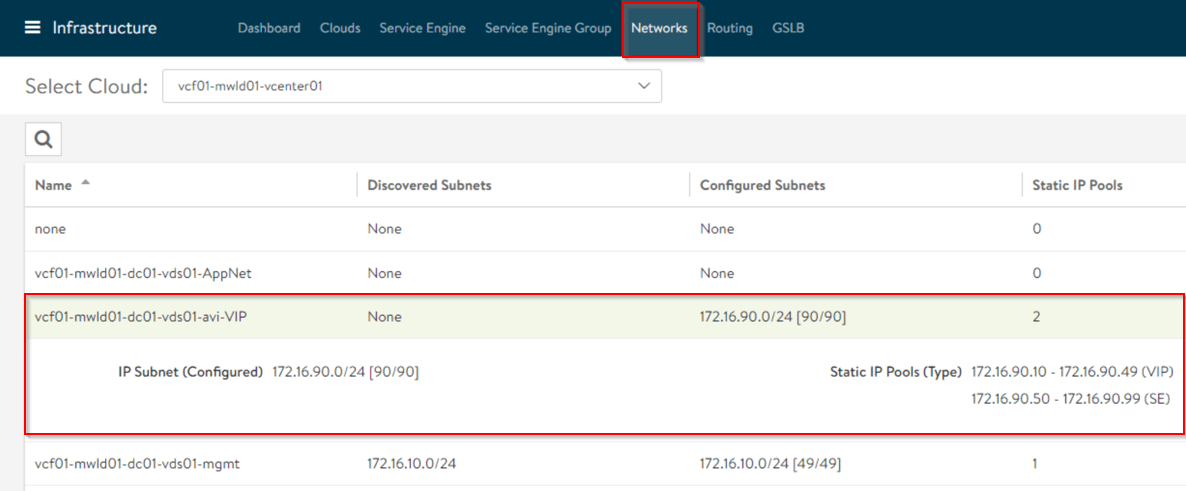
ALB discovers the vSphere networks from the Cloud account. We choose a specific Port Group for hosting the ALB VIPs for the Virtual Services. We also define an IP pool for the VIP addresses and the Service Engine data interfaces.
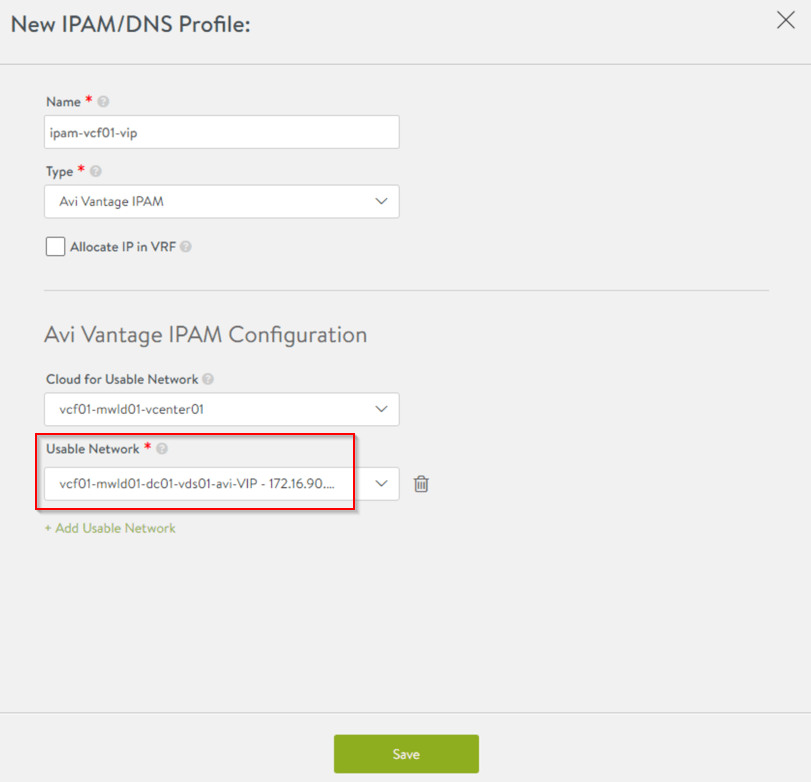
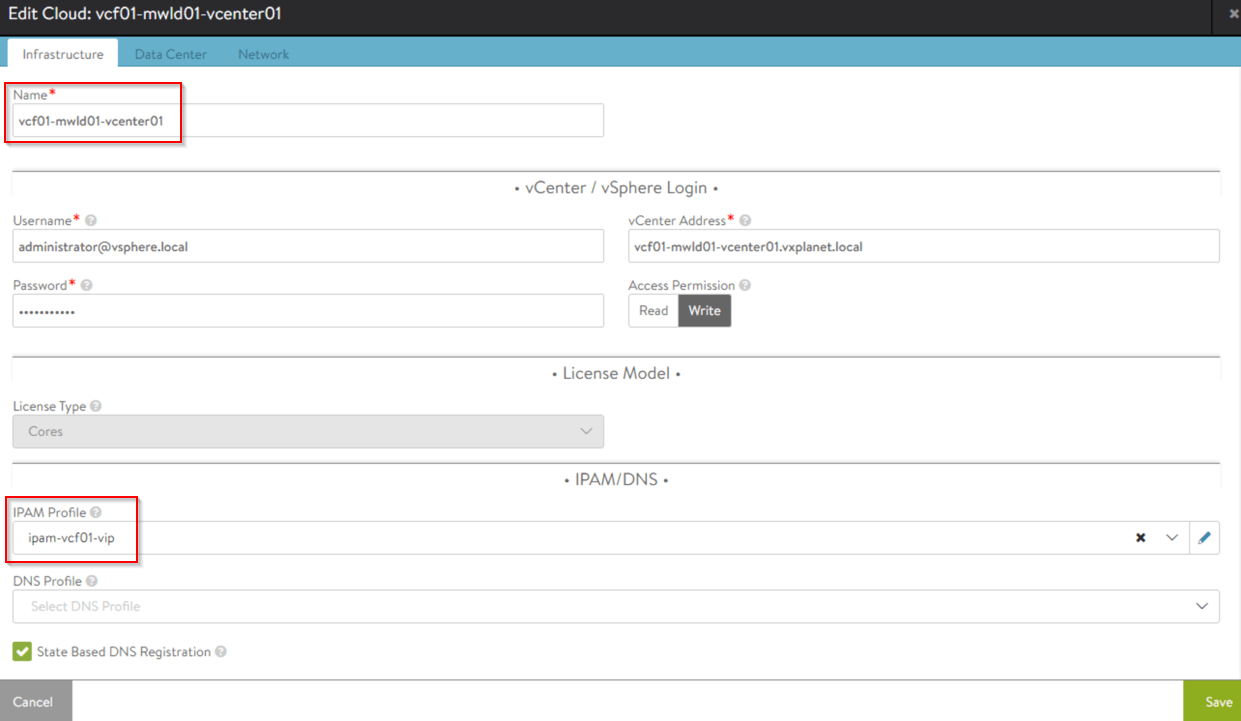
We create an IPAM profile with the VIP port group and associate it with the vSphere Cloud that we created previously.
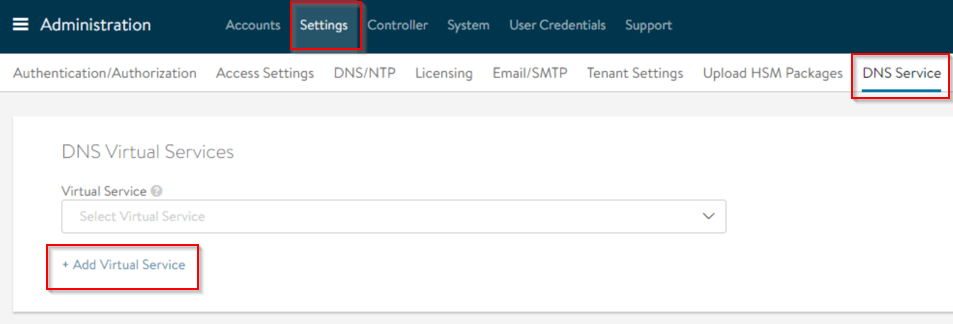
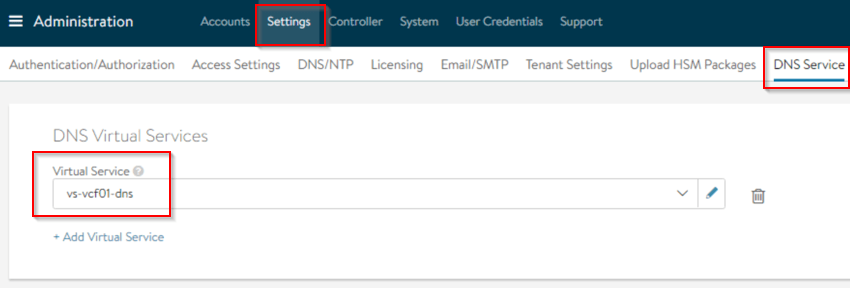
Creating DNS Virtual Service
NSX ALB has an inbuilt DNS server functionality to offer dynamic name resolution for the virtual services that are created. In most cases, we define NSX ALB as an authoritative DNS server for a DNS sub-zone of the corporate DNS network and a delegation is created from the corporate DNS to the NSX ALB for this DNS sub-zone for name resolution of VIP networks from corporate networks.
We have to enable DNS service in NSX ALB and then associate one or more DNS services to it.
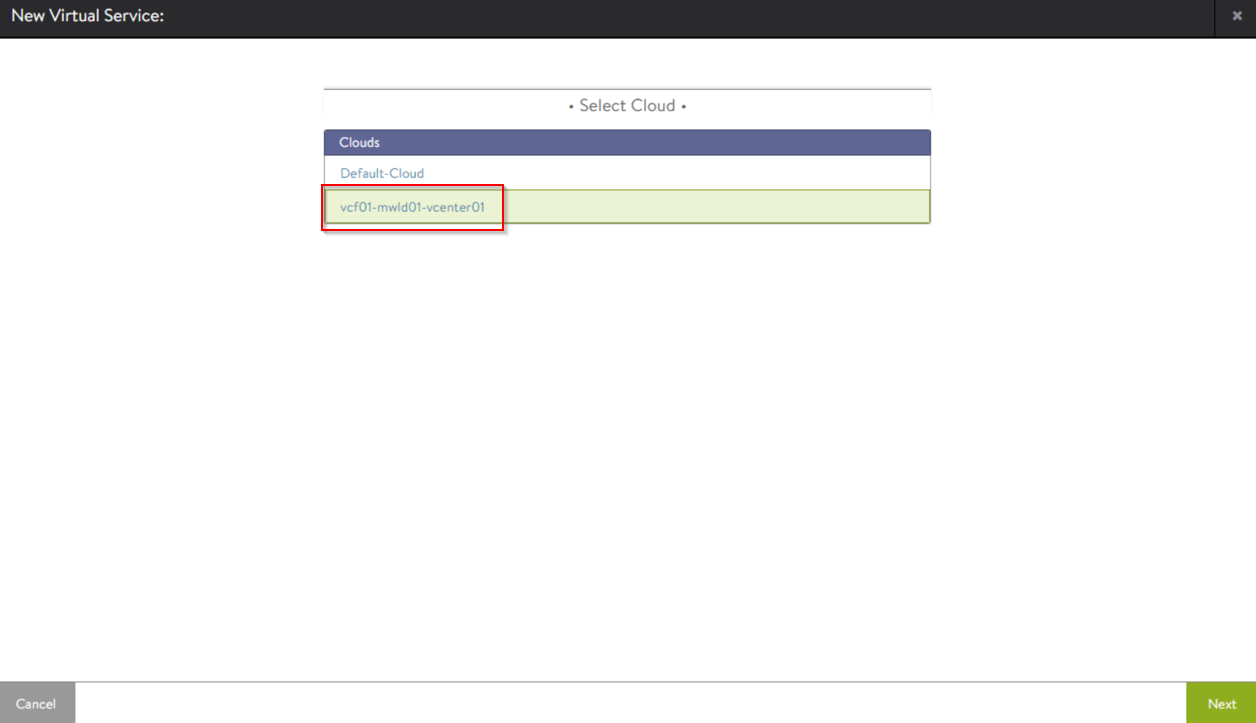
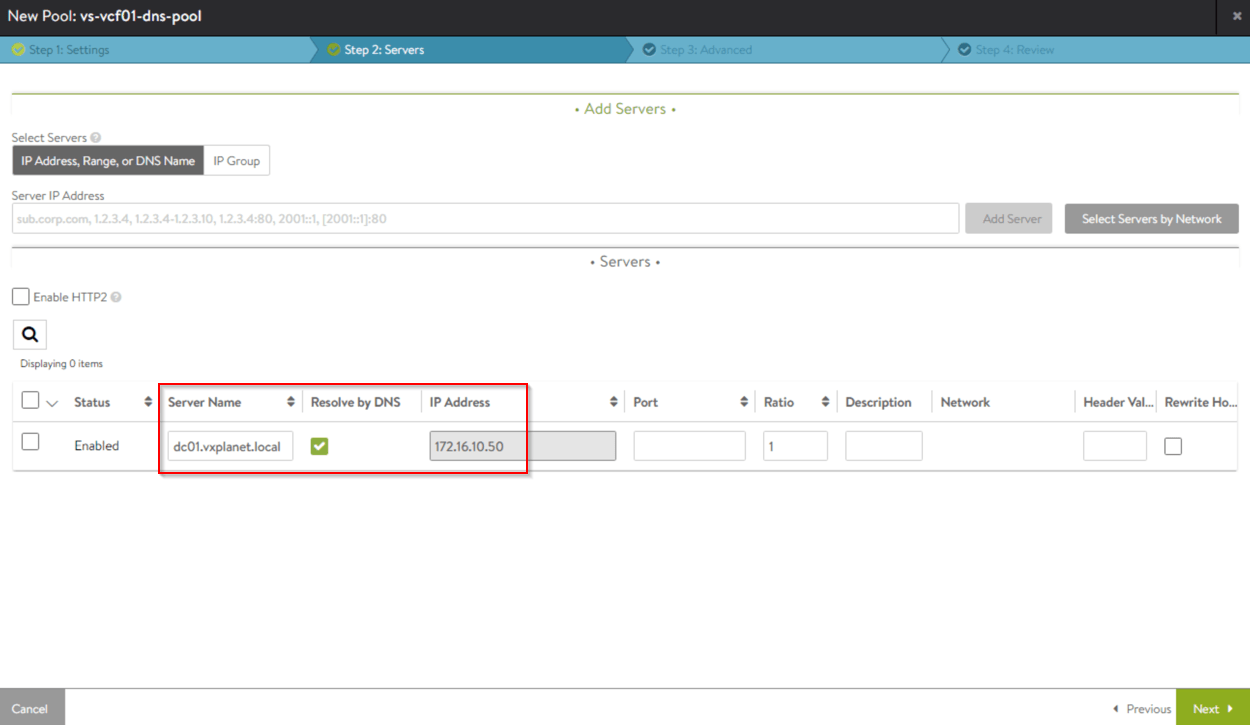
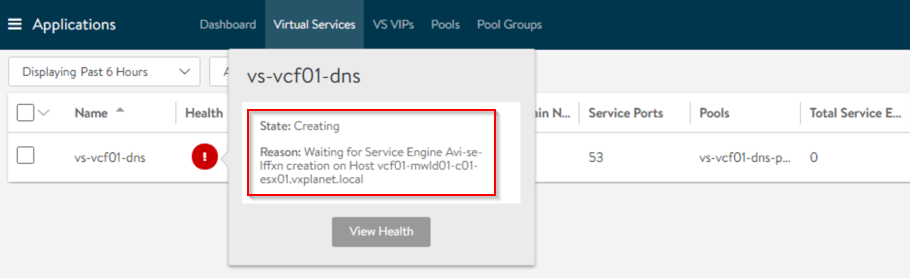
The DNS VS is created in the vSphere cloud account. It is recommended to use a dedicated Service Engine Group (SEG) for the DNS VS.
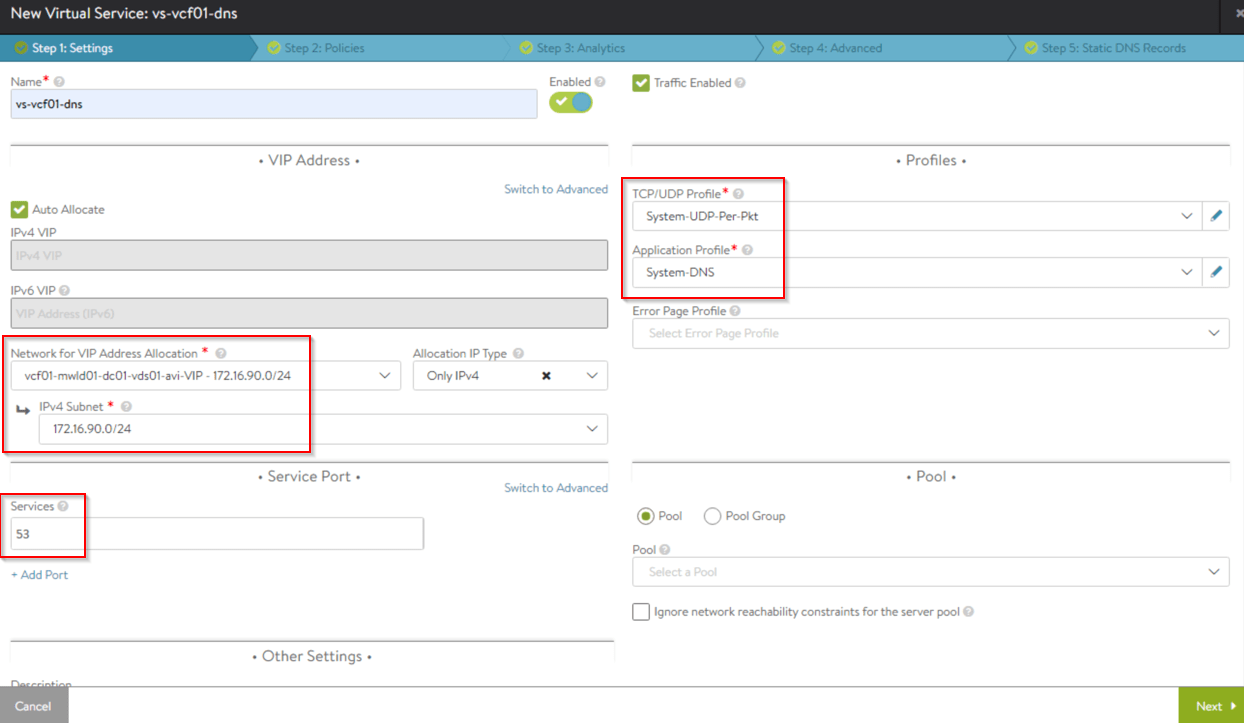
We already have an IPAM profile associated with the vSphere Cloud, hence we select VIP ‘Auto-allocate’. The TCP/UDP profile should be ‘System-UDP-Per-Pkt’ and Application Profile should be ‘System-DNS’.
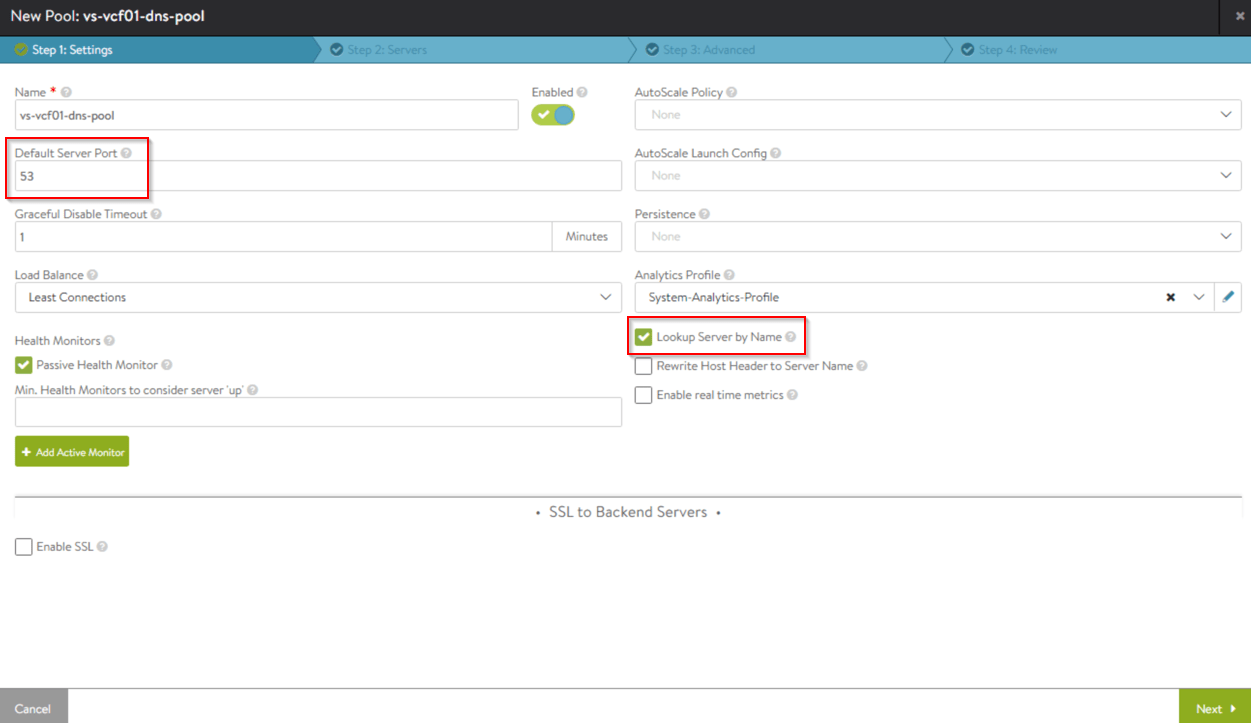
The pool member is the DNS forwarder of this DNS virtual service, which will be our corporate upstream DNS server. This is useful if any clients point to the NSX ALB DNS and want to resolve external FQDNs.
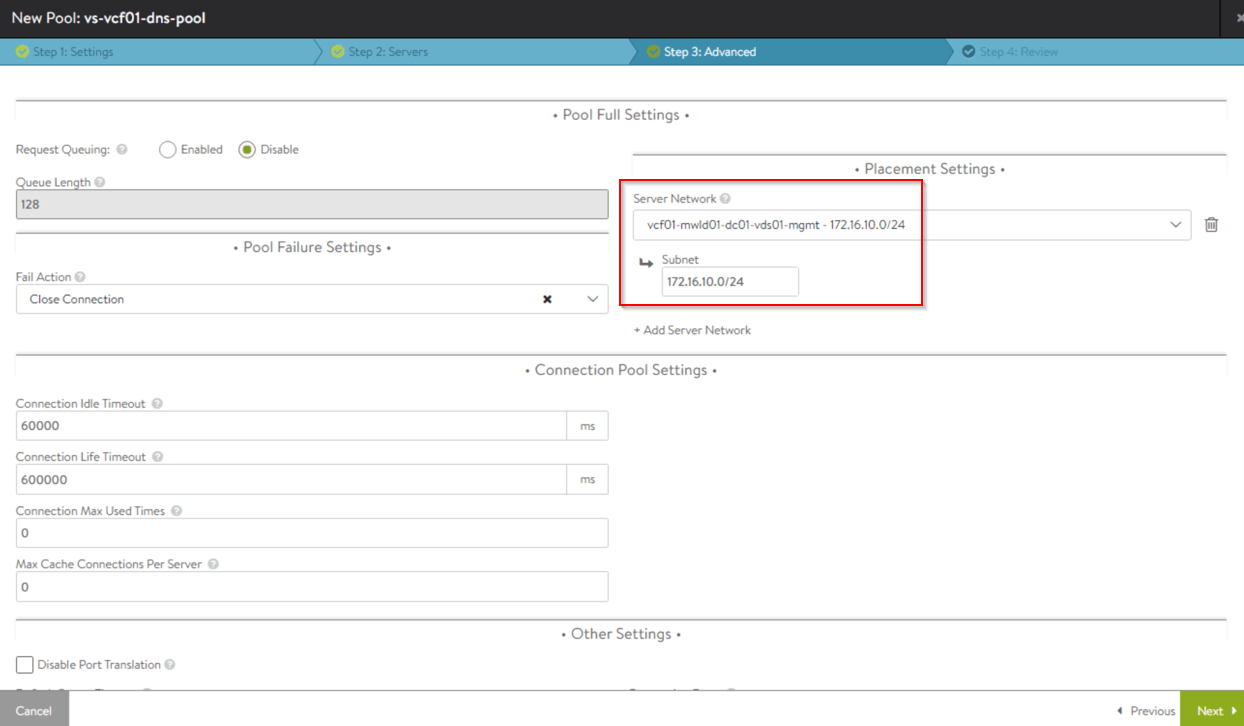
The placement network for the upstream DNS server (pool member) is the Management Port Group in our case:
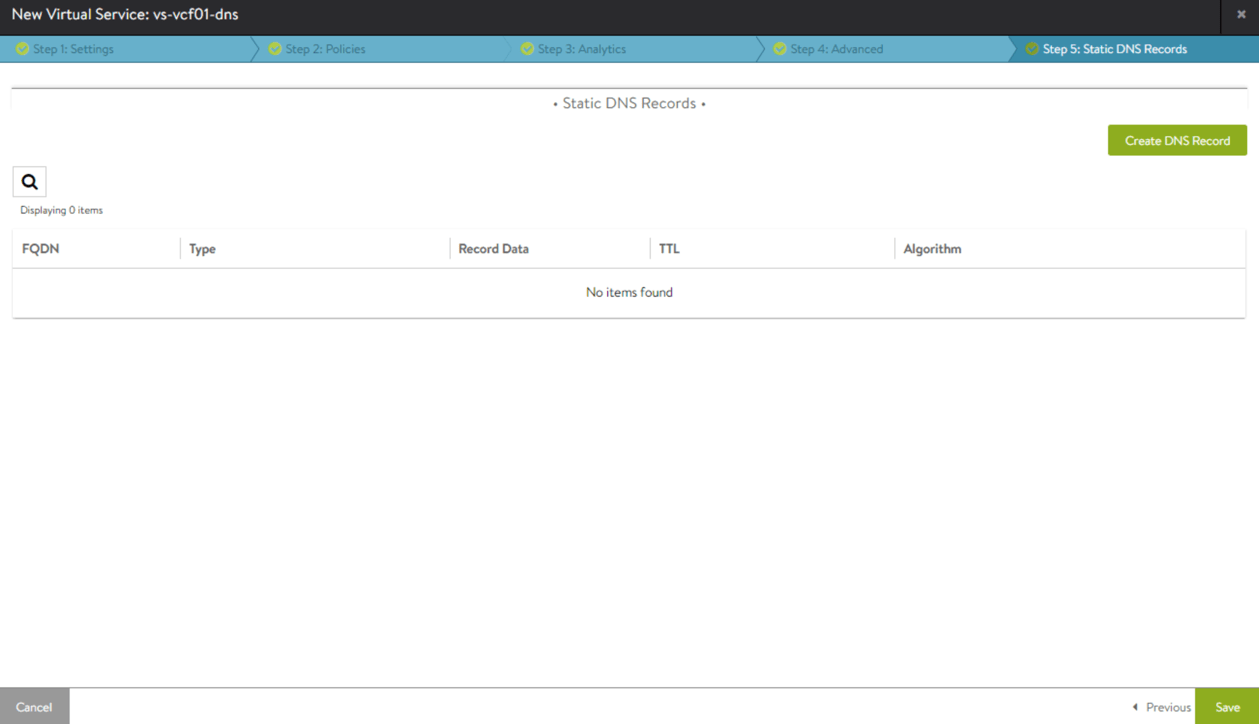
If needed, we can add static DNS records in the DNS virtual service – for eg: alias entries for the application VS’es, Management components etc. All application VS that we create will have dynamic DNS records auto-created.
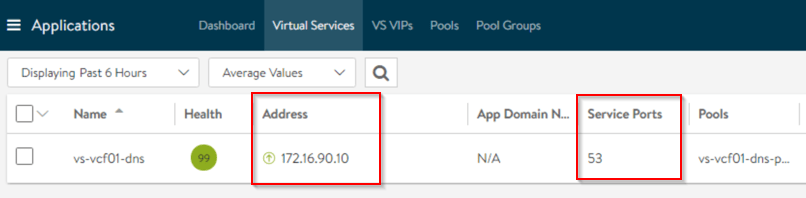
We associate the DNS VS that was created with the System DNS Service.
If we selected a dedicated Service Engine Group (SEG), the creation of VS might take some time as the Service engines need to be deployed and initialized in vSphere.
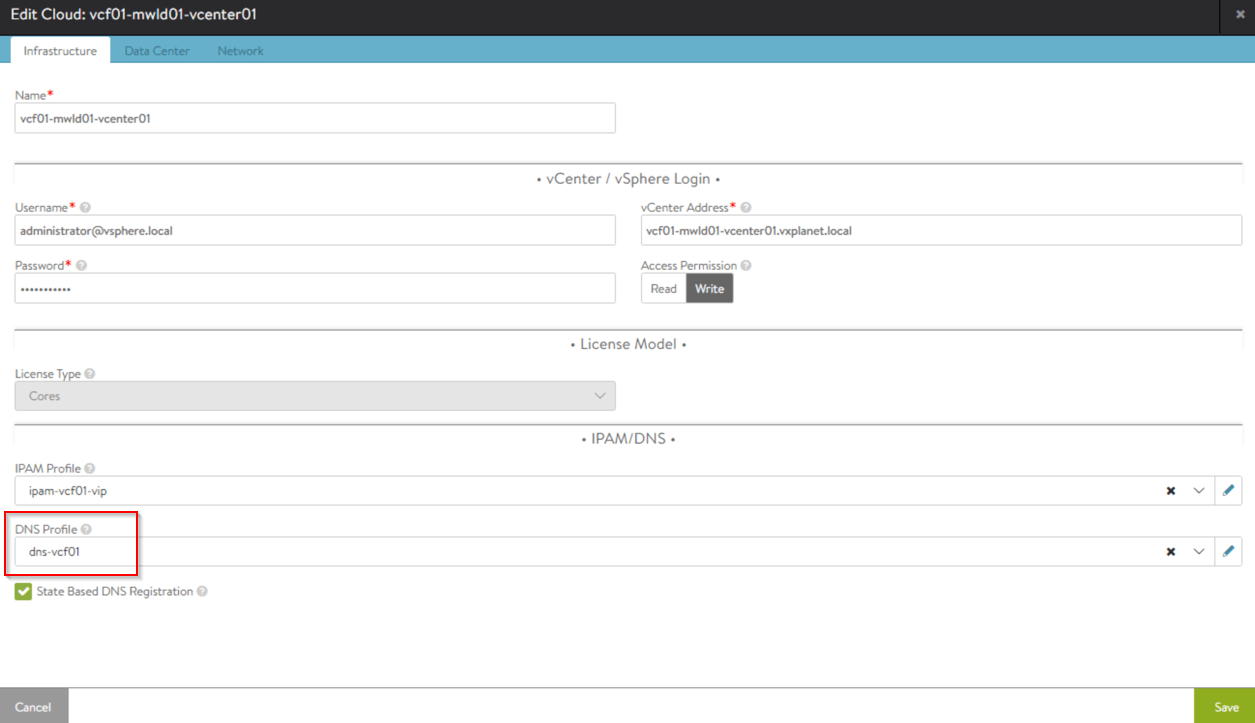
Creating DNS Profile
Now that the DNS Virtual Service is created, we define a DNS domain name and associate with the Cloud account to be used for our applications. If we have multiple Clouds defined, we could map specific DNS domains to Clouds to identify the deployed applications with respect to the cloud where they are deployed.
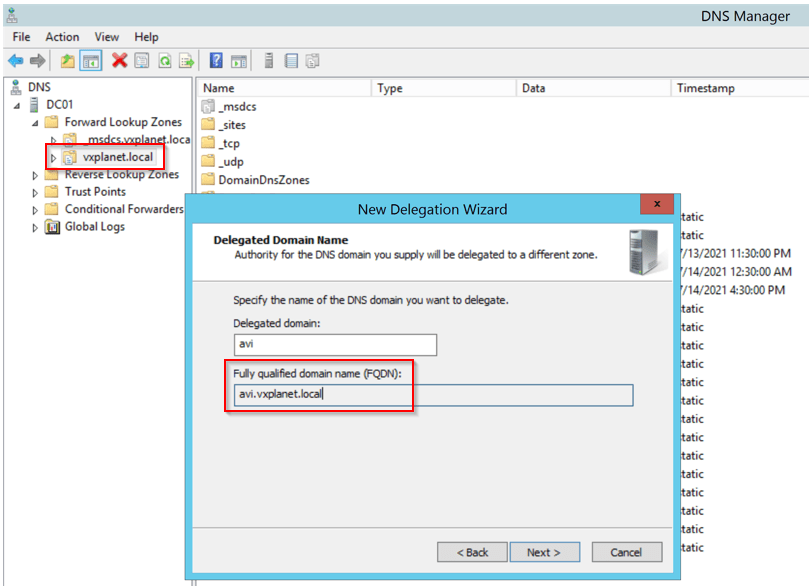
To make configuration easier, let’s define a sub-DNS zone from our corporate DNS network in the DNS profile. The corporate DNS zone is vxplanet.local, and we use avi.vxplanet.local for our deployed applications in NSX ALB.
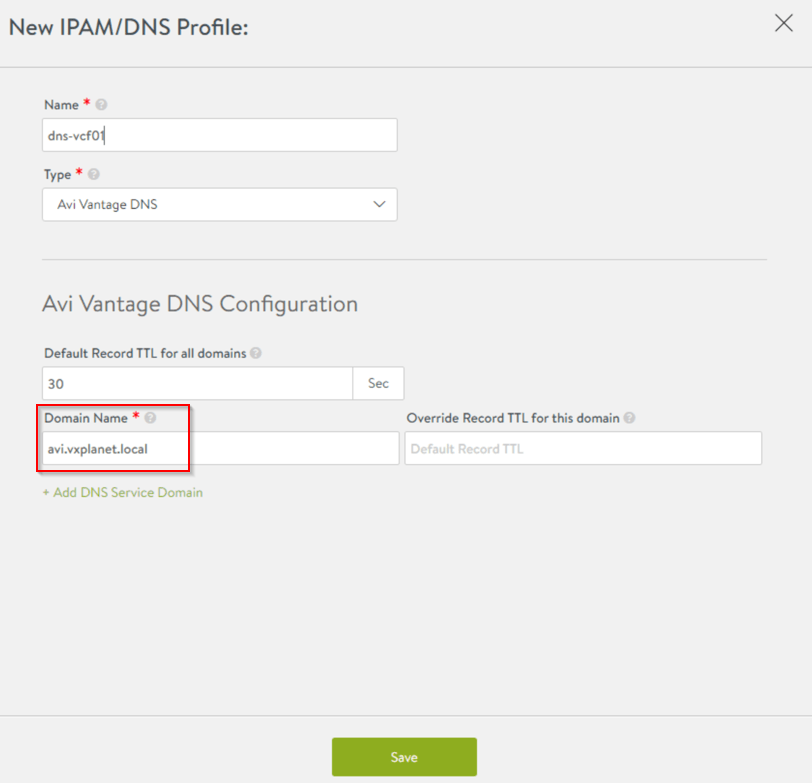
We associate the DNS profile with the vSphere Cloud to make it available for applications deployed in that cloud.
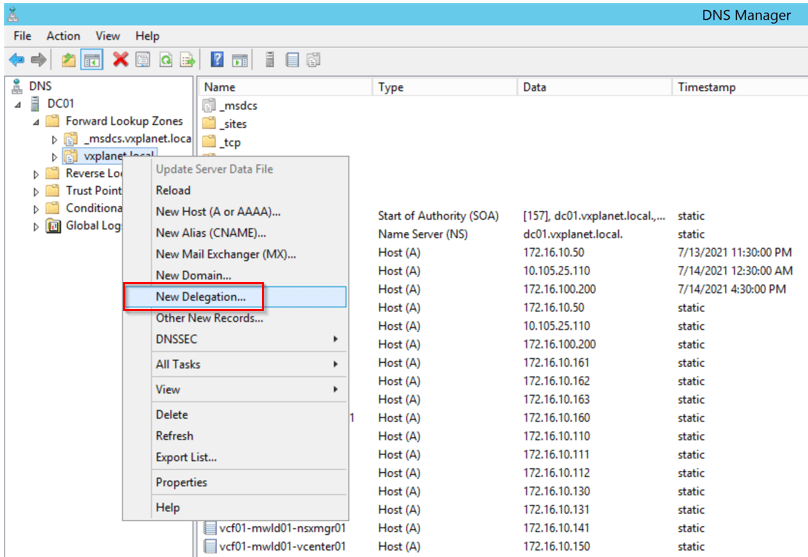
Setting up DNS delegation
To be able to resolve FQDNs of applications deployed in NSX ALB from the corporate network, we need to set up a DNS delegation from the corporate DNS network to NSX ALB DNS Virtual service for the DNS sub zone.
In our case, the corporate DNS server is a Microsoft DNS server co-located with Active Directory.
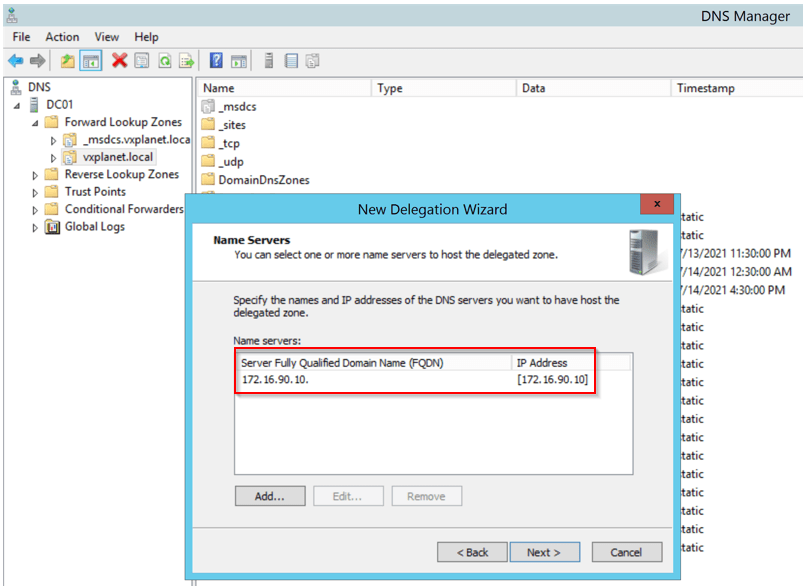
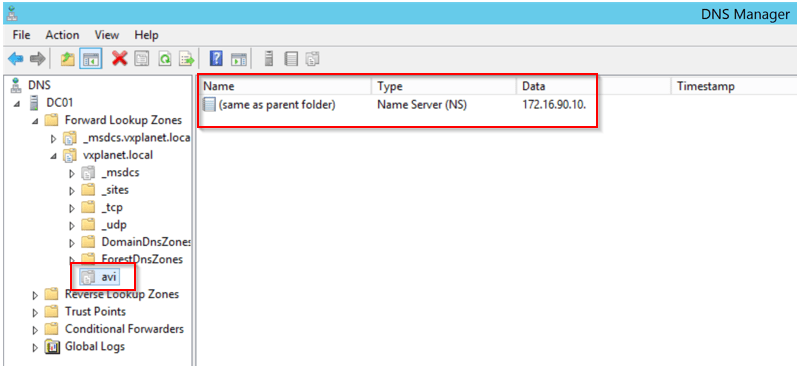
172.16.90.10 points to the DNS Virtual Service VIP on the NSX ALB.
Application TLS Certificates
We will be migrating the intranet and finance applications to NSX ALB. Since we use NSX ALB DNS for the application names, the new application names will be on the DNS sub zone and we require new TLS SAN certificates from the CA. There is no change to the backend servers, it’s just the front end fqdn change where clients connect to.
The intranet and finance apps will be hosted on child virtual services and the TLS certificate is a single domain SAN certificate for the app hostnames. The Parent VS will have a wildcard cert (a catch-all vs) as it handles all other traffic not matched by the child VS’es. To ensure that the certificate trust exists, we also import the root and intermediate CA certs into NSX ALB
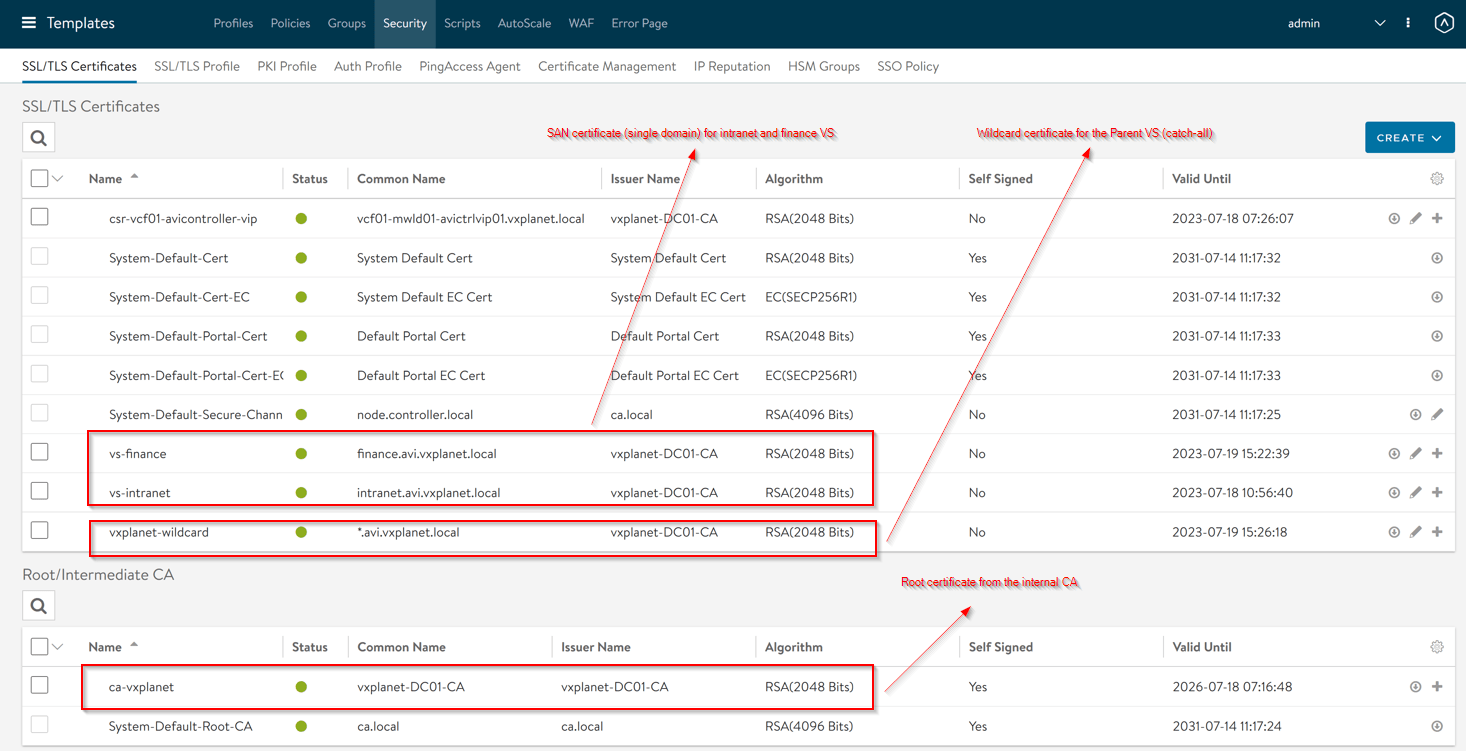
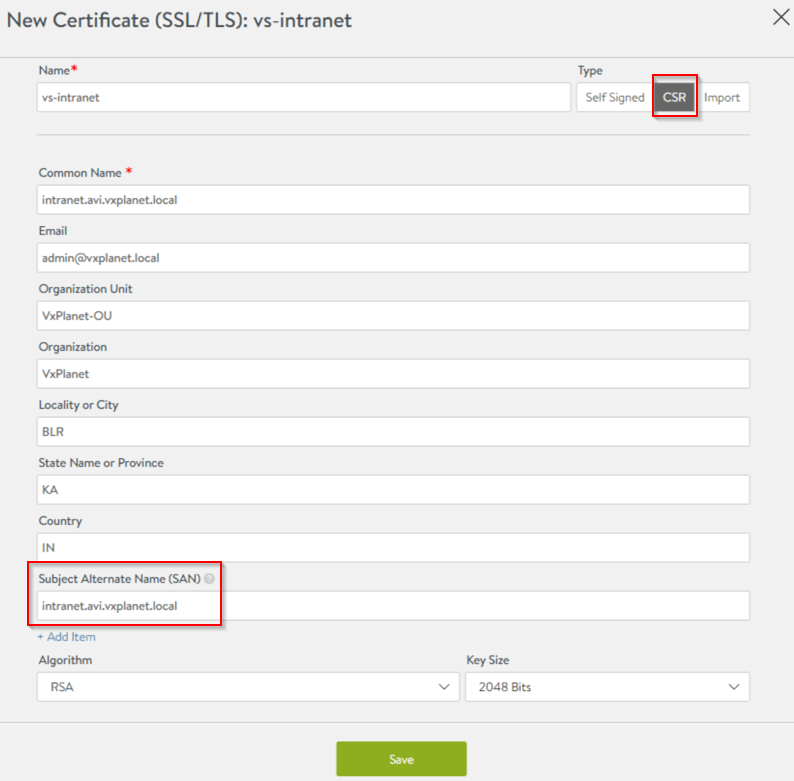
As said above, the child VS will use a single domain CA cert, this is the CSR while requesting a SAN cert for the intranet application. The SAN field has to be populated with the application hostname.
Now that we have the necessary NSX ALB configuration in place, we can go ahead and create the Parent and Child Virtual services for the intranet and finance applications. We will cover that in Part 2, stay tuned.
I hope this article was informative.
Thanks for reading
Continue reading? Here is the other part of this series: